

Building a strong digital presence requires:
- Years of hard work
- Perfect timing
- Opportunity
- Marketing spend
…or does it???
Fortunately, the digital world offers shortcuts to get you moving in the right direction.
The quickest (and probably the cheapest) way of doing this is to advertise specifically to your target market, with a super-relevant offer, at the perfect time.
This means showing ads to people when they are specifically looking for your products.
Facebook offer everyone the opportunity to do this, and if you’re just starting out, this article is going to show you where to begin and how to get started.
BTW: Make sure you check out our guide to Facebook Events Manager when you’re done with this!
What is a Facebook Pixel?
When it comes to marketing, the more you know about your target customer, the more likely you are to reach them with the correct offer at the perfect time.
And that’s why installing a Facebook pixel must be your first step when starting FB advertising.


You might have read guides calling on you to begin by creating audiences, designing your creatives, writing compelling copy, or even hitting the ‘boost post’ button (I shudder at the thought)…
…and whilst they are all necessary components of a great FB ad (except ‘Boost Post’), the future of your digital advertising campaigns are limited until you’ve installed a Facebook pixel.
So, what is this mysterious Facebook Pixel?
I can feel a definition coming on…this is how Facebook describe their Pixel:
‘The Facebook pixel is an analytics tool that allows you to measure the effectiveness of your advertising by understanding the actions people take on your website. You can use pixel data to:
- Make sure that your ads are being shown to the right people
- Build advertising audiences
- Unlock additional Facebook advertising tools’
If things still aren't clear, this is how I'd describe a Facebook pixel:
'A Facebook pixel is a small snippet of code that you place on your website. This 'code' tracks and analyses the actions/behaviour of every visitor (to your website). Facebook then uses its own knowledge of that person (from their social network) to optimise your advertising performance. The more visitors the code is able to track, the more valuable your Facebook pixel will be.'
The fact that the FB pixel can track actions on your website, analyse this data and use it to optimise the performance of your FB ads, makes it integral for all digital businesses.
Even if you aren’t ready to advertise, you should still install the Facebook pixel. It’s free and will automatically track insanely valuable data before you’ve even ran a campaign! Click To TweetWhat Does a Facebook Pixel Allow You to Do?
A Facebook pixel allows you to employ a host of different optimisation techniques that will supercharge your advertising ROI. In the list (below), I’ve highlighted a few that I consider the most effective:
Event tracking:

A Facebook pixel allows you to create specific events that occur on your website e.g. purchase, add payment info, add to cart, complete registration, subscribe.
In total there are 17 standard events, as well as the opportunity to create your own. This data can be used to create Facebook ads, retarget and run future promotions.
For example, if I set-up ‘add to cart’ as an event, I could create a custom audience of the people who triggered this event and show them an ad for the product that they clearly wanted but didn’t buy.
Create Custom Audiences:
The example (above) is a great way to create an effective automated ad sequence off the back of a custom audience, but there are a ton of different custom audience building options thanks to a Facebook pixel.
The more data the pixel grabs, the more audiences you are able to build, so make sure you install it as soon as possible! Find out more about Custom Audiences.
Conversion Optimisation:

The pixel tracks data from people who completed purchases on your website and shows ads to similar people who it believes will also complete a purchase.
The more sales you generate (with a pixel installed) the better Facebook will be able to automatically optimise your conversion rate.
Retargeting:
Installing a pixel allows you to show relevant ads to people who have visited your website.
If you’ve ever seen ads for a product that you viewed but didn’t purchase, shortly after viewing it, it means you’ve been retargeted.
Retargeted ads have a much higher CTR and conversion rate, and if you’re serious about digital marketing, you must use it.
Create Lookalike Audiences:


Lookalike audiences are people who have similar interests, demographics and likes as audiences that you have already built.
This type of audience are most effective when used on a custom audience. This means that you can track a specific event on your website, content or landing pages (e.g. buy) and ask Facebook to people who are similar to that audience.
For example, you could create a lookalike audience of people who purchased on your website, allowing you to scale up your campaign quickly.
BTW: You can learn how to do this in our Facebook Audiences eBook!
Optimise ad spend:
If Facebook are able to show your ads to only the most relevant people, it will automatically optimise your ad spend.
Meaning that you're able to make the most out of your marketing budget!
How to Create a Facebook Pixel
Before you can install a Facebook Pixel you will need a Facebook Business Manager account. This is a really simple process that anybody with a Facebook profile can undertake in a few easy steps.
Learn how to set-up a Facebook Business Manager Profile here.
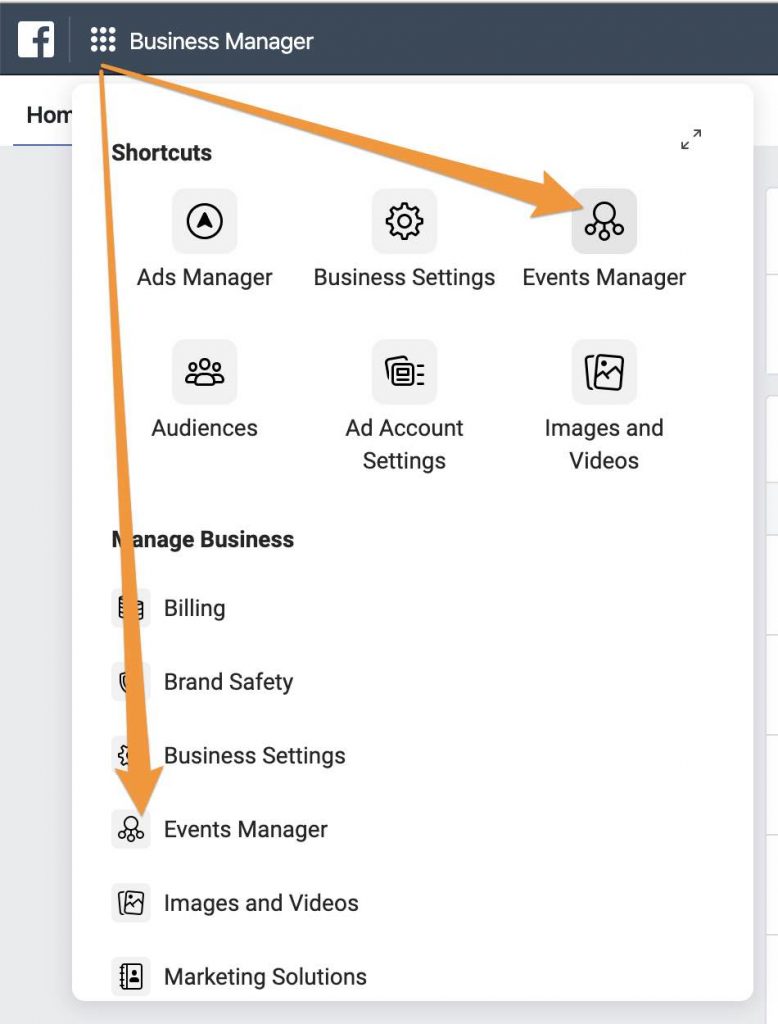
When you have a business manager account and you’re logged in, you’ll see a main menu on the left side of the screen. Click on the 'Events Manager' option:


If you have never created a pixel before, you’ll see a big green button saying ‘Create a pixel’ in the middle of your screen.
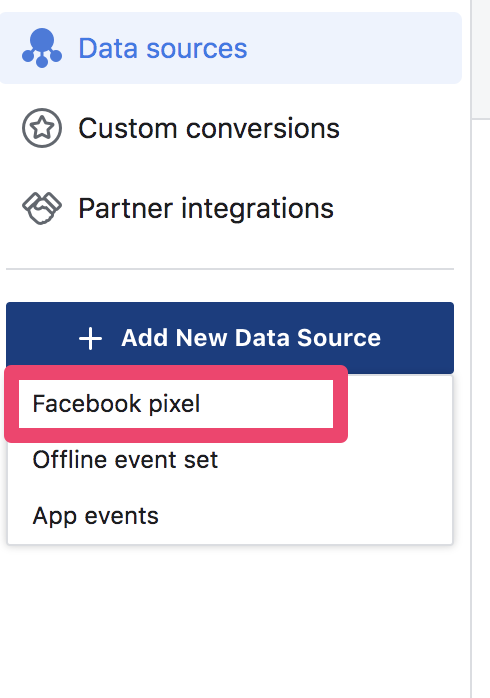
If you have created a pixel before, head over the ‘+ Add New Data Source’ button on the left of your screen and select the ‘Facebook pixel option’:

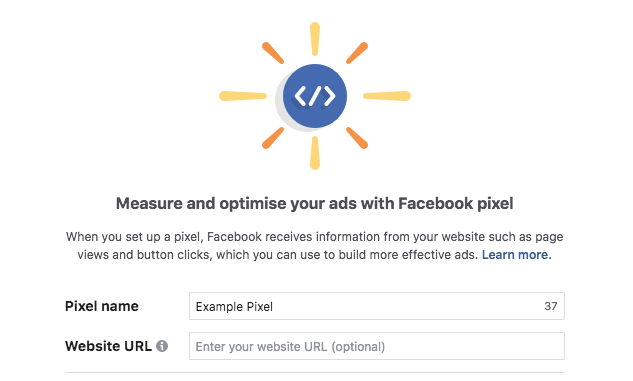
After this, all you’ll need to do is name your pixel and enter your website’s URL (this is optional if your site isn’t live yet):
Installing a Facebook Pixel
There are three different ways to install a FB pixel:
- Use an integration or tag manager: Copy and paste a code into the appropriate place in your CMS backoffice (e.g. WordPress, Shopify, SquareSpace)
- Manually install the code yourself: This involves adding the pixel code to the header tag of your webpages. Facebook will walk you through this process if you select this option.
- Email instructions to a developer: Exactly what it says on the tin, Facebook will email the pixel details to a developer of your choice.
The option you choose will depend on your CMS (Content Management System) and technical proficiency.
Unfortunately, I won’t be able to walk you through every single different CMS available (there are just too many!).
…but, I can point you in the direction of Facebook’s official guide to installing your Facebook pixel.
Conclusion


Every day that slips by without a Facebook pixel on your website is a wasted opportunity.
You’re missing out on priceless chances to optimise your ads, retarget and build countless profitable audiences (find out how to discover your competitors FB Audience targeting tactics!).
This is the first step in your Facebook advertising journey and it’s not a process that you can afford to miss, so whatever you do, don’t ignore the Facebook Pixel!
Want more social media marketing strategies, advice and tactics? Check out one of our most popular ever marketing guides:
- Facebook Page Likes: How to Get 1000s For FREE
- Instagram Post Reach: 9 Tactics to Reach More People on Insta
- How to Use Instagram Hashtags (and How Not to)
- Social Media Image Sizes 2020
- Facebook Ad Algorithm: Reach More People With Your FB Ads

